Warping More Than Just Text
The new Warp Text feature in Photoshop 6 has inspired a rash
of inquires about warping things other than text, as well as
some serious version-envy among folks who have not yet
upgraded. Here's how to warp anything, using Photoshop 6 or
5.5
A recent question from Michael Standlee
(of Michael Standlee Design) inspired me to experiment more
and more with bending and warping objects. It seems that
we've had the near-perfect tool for the job all along, right
there under our noses. (Or under the Filter menu, to be more
precise.) Let's take a look at using the Shear filter
(Filter> Distort> Shear). To start, let's explore the
filter's dialog box.
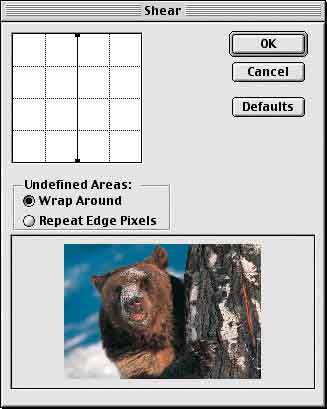
To the left is the meat of the dialog box,
the control line. Much like using the Curves adjustment
dialog box, you place and move points on the line. In this
case, however, the bends in the line represent warping of
the image.
To the right at the top are the OK and
Cancel buttons, along with a button to reset the dialog box
to its default values, which are shown and which have no
effect on the image. (Shear will remember the last-used
settings.) At the bottom of the dialog box is a preview
window. The preview is restricted to this window and is not
shown on the image itself.
The center of the dialog box is where you'll
find the only tricky part of the Shear filter, the choice of
options for Undefined Areas. Parts of the image are
considered "undefined" when the original pixels are moved
away from an edge and there are no neighboring pixels to
replace them. As you warp an image, pixels move past the
edge of the selection and can be wrapped around to the other
side of the selection:
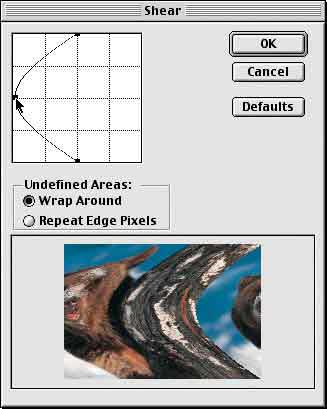
As a point is added, the control line
becomes a curve and the image is curved to match. The side
of the bear's face moves off the screen to the left and,
with the Wrap Around option selected, it reappears on the
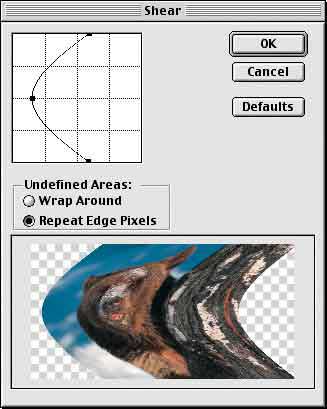
right. If the option is changed to Repeat Edge Pixels, the
effect is substantially different at the edges of the
selection:

Notice how the right-most column of pixels
are "stretched" as the image is warped to the left.
When working with photographs, neither option is
particularly attractive. Avoid the problem of repeating or
stretching edge pixels by making a selection that includes
an adequate area of transparency on either side of the
image. How much is enough? When warping in only one
direction, as shown so far, you need enough transparent area
to accommodate the pixels being warped (to the left, in
these examples) and a minimum of a single column of pixels
to the right (with Repeat Edge Pixels selected). You can, of
course, expand your selection (or canvas) to include a large
area of transparency on either side and then crop the
sheared image afterward. Here, the image was expanded to
accommodate the anticipated warp:
Because of the transparency, the Undefined
Areas option is insignificant � wrapping and repeating
transparency results in the same thing: transparency.
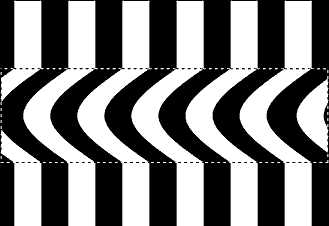
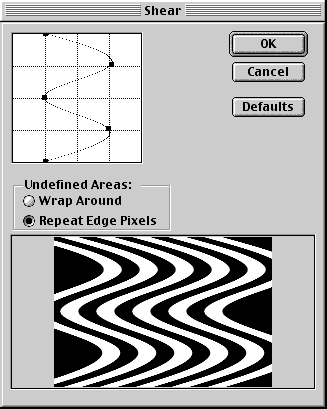
When working with shapes or patterns, the
choice of wrapping or repeating might be very important. In
this example, the middle portion of the image was selected
and the Shear command applied. Wrapping the edge pixels from
the left side back around to the right side of the image
maintains the pattern.
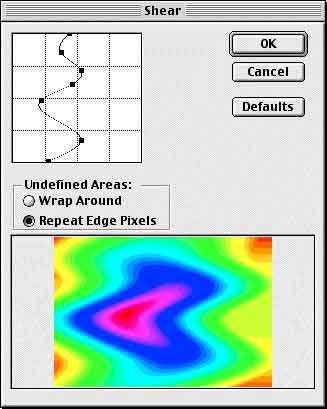
Multiple points can be added to the Shear
filter's control line and the filter can be applied with
great effect to gradients.
Now, for a practical application, let's look
at how the Shear filter can be used to simulate applying an
image to a curved surface. The challenge in this example
will be to create a curvature for the text to match that of
rim of the cup.

We need a couple of steps of preparation
before we try to apply the Shear filter.
� The Shear filter cannot be applied to
text. Therefore the type layer must be rasterized (rendered)
first. The command in Photoshop 6 is Layer> Rasterize> Type.
� The entire image must be rotated sideways
so that we can apply the filter. (Image> Rotate Canvas> 90�
CW in this case.)
� Make sure that the layer which contains
the type (or other pixels to be warped) is active.
� Use the Commands Edit> Preferences> Guides
& Grid and View> Show> Grid to provide a reference for the
amount of shearing required.
� Make a selection that is centered on the
type vertically, and extends past to the left and right to
accommodate the effect.
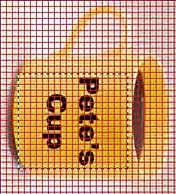
Using the grid as reference, we can see that
in the width of the text (in this case, since it's rotated,
the height of the text from the "P" to the "s"), the cup's
rim dips approximately one-third the height of the letter P.
In the Shear dialog box's preview window, we can use the
transparency grid to help us guess-timate the approximate
curve.
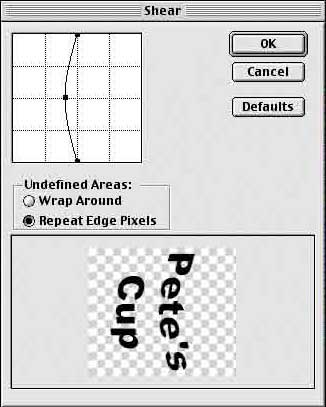
After applying the filter, we reverse the
rotation (in this case, using Image> Rotate Canvas> 90� CCW),
and position the text where it looks best.
Then, of course, you'll want to add some
finishing touches:
� In images that simulate long distances,
application of a slight blur to the outer edges can be
effective.
� If you're adding a colored logo or
colorful text, work with the layer blending modes to get the
highlights and shadows to match. (This won't work with black
or white text.)
� You can use the toning tools (Dodge and
Burn) to simulate highlights and shadows (again, with the
exception of black and white).
� If you've used black or white text, you
can simulate reflections and highlights using the Eraser
tool set to a very low opacity and with a soft-edged brush,
as we've done here.

While Photoshop 6's new Warp Text capability
is fun (and handy) you do have a tremendous amount of
control for warping rendered type and other images with the
Shear filter. Remember that the text must be rendered first
(unlike the Warp Text feature), and keep in mind that the
Shear filter works left-&-right, not up-&-down. The command
Image> Rotate Canvas> 90� CW and the command Image> Rotate
Canvas> 90� CCW can come in very handy!
NOTE:
Those having trouble with the Warp Text feature should
remember that the Character palette's menu can be used to
remove Faux Bold from selected text or from a type layer.
|