Bevel Tricks
There is a technique concerning the lighting and shading of
the bevel in that tutorial that has opened new doors for me,
and I thought I would share it with you. And what better way
to share it than to show you! Here's a demonstration.
To start, I have a 2 layer image (white background, 50% gray
text).

I hope that you are becoming familiar with
Layer Styles in Photoshop 6, as we will use these to turn
our type into some form of plastic or glass. I'm going into
this with little idea what the end result will be� it makes
the process a bit more interesting that way!
On the type layer, I'm going to apply a
bevel. As I am going for a glassy effect I want a soft
bevel. With this in mind, my initial settings are:
Style: Inner Bevel
Technique: Smooth
Depth: 250%
Direction: Up
Size: 12
Soften: 5
All other settings are at default. Here's
the image now:

Now that the shape of the type is
established, it is time to work on the shading. This is
where things start coming together.
The trick here concerns the 'Shadow Mode'.
You will see the Photoshop default setting is 75% black,
mode set to multiply. Also the highlight mode is set to 75%
white. Let's bump that up to 100%. Change the Shadow mode
color to something very light, though not white. My color
number for this example is #FFE5BC. Also, I'm changing the
mode from multiply to screen. I've changed the opacity to
88. Here's the result:

Sorta needs something, doesn't it? Let's add
some color. I'm adding a Color Overlay with #FF7200 set to
75%.
Now I'm duplicating the type layer and setting it to
overlay. I'm continuing to work on the original layer,
however.
If you have been viewing the styles that
shipped with Photoshop, you may have noticed that right now
your type resembles the effect in the 'Glass Rollover'
styles pack. Those styles are another excellent resource for
learning shading, and I strongly urge you to get into the
settings those effects apply. They will teach you much,
Young Grasshopper.
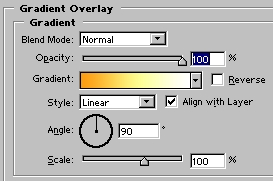
As I continue, I'm applying a Gradient
Overlay to our original text layer with the following
settings:
I am also applying a Stroke using a
gradient. Here is the image:

Remember the duplicated layer? Create a
layer beneath that one and reselect the duplicated layer.
Merge down, change the mode to overlay. On the original type
layer I've moved the bevel slider to 16.

So is the image transparent? Try dropping an
image below the top layer, and set the image to overlay as
well. Here's mine:

|