Gradients in Photoshop 6 (part 3 of 3)
One of the lesser-known capabilities in
Photoshop 6 is the Noise Gradient. An option when
creating or editing a gradient, it produces some truly
wild gradients! While they have their uses for complex
masking (in some limited circumstances), noise gradients
are excellent for special effects and creative accents.
Generally speaking, a noise gradient
uses a range of colors you determine, but rather than
blending between two colors, the Gradient Editor
generates a series of colors and blends them. The colors
are randomly generated within the parameters you set.
To begin the exploration of noise
gradients, open the Gradient Editor dialog box.
1. Select the Gradient tool in Photoshop's Toolbox.
2. Click once on the sample gradient in the Options Bar.

When the Gradient Editor opens, select
Noise for Gradient Type.

The Gradient Editor's options will
change to those shown here:

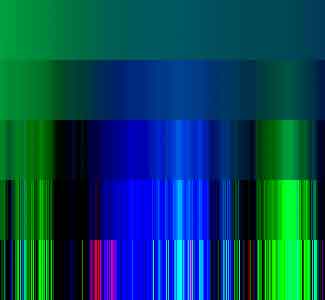
The first option to explore is
Roughness. Similar to the Smoothness slider for "Solid"
gradients, Roughness determines the abruptness of the
transition between colors. In the example below, there
are five noise gradients. The only difference among them
is the Roughness setting. From the top, they are 0%,
25%, 50%, 75%, and 100%.
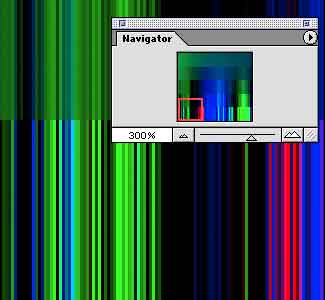
At 300% zoom, you can see that each of
the stripes of color in the 100% Roughness sample is one
pixel wide. (It doesn't get any rougher than that, does
it?) Keep in mind that high levels of Roughness can
produce pixelization when used with non-linear
gradients.
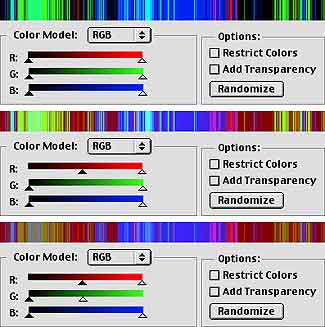
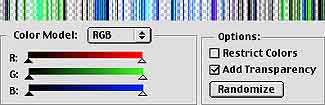
The default color model is RGB.
Adjusting the sliders determines what colors will be
used to create the gradient. Note the positions of the
black and white sliders in the following examples.
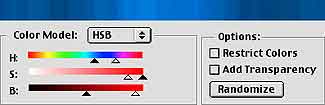
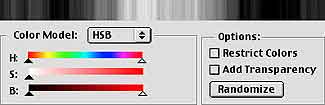
HSB (Hue/Saturation/Brightness) is an
alternative color model for noise gradient creation. In
fact, it's probably easier and more precise to use in
most cases. This is especially true if you want to
create a gradient using only tints of a particular hue.
In this sample, note how smooth the gradient is, even
though Roughness is set to 50%. That is due, in part, to
the restricted range of brightness and saturation.
You can also use HSB color model to
create a grayscale noise gradient. Simply drag the white
S slider all the way to the left. Reducing the
saturation of all colors to zero produces gray.
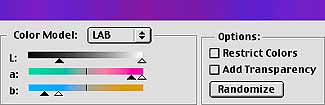
The third color model available is
L*a*b. This mode allows you to produce in seconds very
subtle gradients that could take a tremendous amount of
work in the Gradient Editor's Solid gradient type.
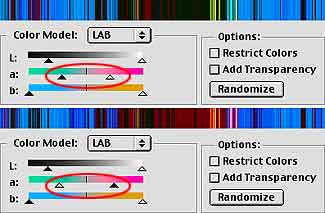
Lab mode is also great for showing that
you can move the black and white sliders past each
other. Compare the "a" component sliders in the two
samples below, and look at how it affects the gradient.
So, we've seen RGB, HSB, L*a*b, and how
to fake a grayscale. What about CMYK? To the right of
the sliders is a checkbox labeled "Restrict Colors."
When this option is selected, the Gradient Editor will
rein in the gradient, keeping all colors within the CMYK
gamut.
The checkbox immediately below, "Add
Transparency," does exactly that:
The Randomize button allows the Gradient
Editor to mix and match within the color range
specified. You can click it multiple times,
experimenting until you see a gradient you like.
Remember, too, that you can adjust the sliders after
clicking the Randomize button to fine-tune the gradient.
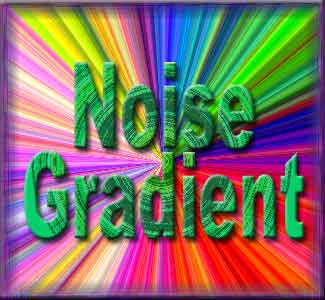
Now that you've learned how to work with
the Gradient Editor to produce noise gradients, let's
take a look at my favorite use for them. Working with
the Angle Gradient tool, you can produce some very cool
effects.
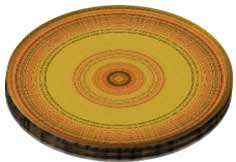
Circular noise gradients can also be
useful.
You'll also find a grayscale noise
gradient to be perfect for creating those dusty beams of
light streaming through the window....
|