Gradients in Photoshop 6 (part 2 of 3)
To really take advantage of
the power of gradients, it's necessary to create your own
gradients. One of the easiest ways to do so is to edit
existing gradients. In this installment, we'll look at the
anatomy of the Gradient Editor dialog box. At first glance,
that dialog box is daunting, but once you understand the
basics, editing and creating gradients is a snap.
With the Gradient tool active in the
Toolbox, you'll see a sample of the currently-selected
gradient in the Options Bar. Click once on the gradient
sample in the Options Bar to open the Gradient Editor dialog
box.
The dialog box, shown below, looks pretty
complicated at first glance. It is really rather simple.

The upper portion of the dialog box is
actually the complete Gradient Palette. Thumbnails of all
currently-loaded gradients are shown, along with the
Gradient Palette's menu.
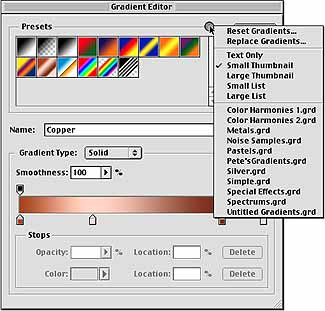
However, if you compare the menu above to
that shown below, you'll see several differences. For
example, when accessed through the Gradient Editor, the
Gradient Palette menu does not offer the Load, Save,
Replace, Delete, or New commands.

Load and Save are available in the Gradient
Editor dialog box itself, and New Gradient is handled
through the editing process we're about to explore. The
Replace and Delete commands, what can be considered "palette
maintenance commands," are only available through the
regular Gradient Palette menu.
Choose the gradient that you want to edit or
from which you want to create a new gradient. For this
example, we'll show the gradient "Copper." (If Copper
doesn't appear in your Gradient palette, use the palette's
menu command Reset Gradients.)
There's no need to assign a new name at this point or to
click the New button. The Editor will automatically preserve
the original gradient. As soon as you start making changes,
the name will change to Custom. After the changes are
complete, name the new gradient and add it to the palette by
clicking the New button. (Remember, too, that collections of
gradients aren't saved until you use the palette menu's Save
command.)
Let's take a look at the lower half of the
dialog box.

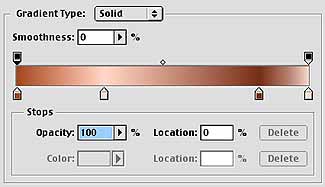
At this point, we'll work only with Solid
gradients. The Smoothness slider, which ranges from 0% to
100%, affects the suddenness of the transition from one
designated color to the next. As you can see in the example
below, the lower levels of Smoothness produce narrower, more
evident areas of the specific, designated colors. (Look, for
example, at the vertical streak of white about one-third in
from the left, and the dark streak near the right side of
the image.)

Smoothness applies to the entire gradient,
not specifically-designated sections of the gradient.
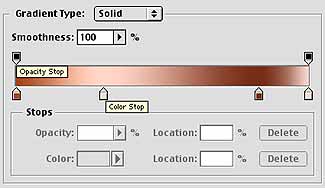
Below the Smoothness slider is the sample
gradient. It is updated live, as you work. Notice the
triangles above and below the gradient sample. They are
known as "stops." Those above the sample control opacity;
those below the sample control color. They are known
respectively (and intuitively) as opacity stops and color
stops.
You activate a stop to make changes by
clicking on it or dragging it. When a stop is active, the
triangle will be filled with black. Only one stop can be
active at a time. When an opacity stop is active, the two
boxes immediately below the gradient sample are active. You
can drag the stop to put it at any location on the gradient
sample. In the field below, you designate the opacity of the
gradient at that point. The gradient's opacity is, of
course, subject to the blending mode and opacity specified
in the Options Bar and that of the layer upon which the
gradient is dragged.
Rather than dragging the opacity stop to
reposition it, you can click in the Location field and
designate a position. The location is shown as a percentage
of the distance from the left (0%) to the right (100%) of
the gradient.
The small diamond between opacity stops
determines the balance of the change from one stop to the
next. When active, it is filled with black. The diamond acts
much like Smoothness, but only between the adjoining stops.
For example, if a stop at the left end of a gradeint is set
to an opacity of 100% and a stop at the right end of the
gradient is set to 0%, by default the transition will be
smooth. The midpoint between the two will have an opacity of
50%. If, however, the diamond is dragged closer to the right
stop, the 50% opacity point will be relocated to the
diamond's position. In the example below, the default
gradient Foreground-to-Transparent has been selected. In the
top sample, the default values have the 50% opacity value in
the middle. In the bottom sample, the small diamond has been
dragged in the Gradient Editor toward the right opacity
stop, to the 85% spot. (A diamond's location can also be
input into the Location field when the diamond is active.)

Below the gradient sample are the color
stops. Like opacity stops, color stops can be placed
numerically or by dragging. Change the color of a color stop
by clicking on it to make it active and then choosing the
color either from the menu shown here or from the Color
Picker.

You open the Color Picker by double-clicking
the stop itself, or by clicking the color sample next to the
menu shown above. Also like opacity stops, you'll find the
midpoint diamonds between the active stop and its
neighboring color stop(s).
There are several other basic concepts to
know about working with color and opacity stops in the
Gradient Editor:
� There must always be at least two of each,
although they do not have to be at the ends of the gradient.
� To add a new opacity stop, click just above the gradient
sample.
� To add a new color sample, click just below the gradient
sample.
� Delete either kind of stop by dragging it out of the
Gradient Editor dialog box.
� You can also delete an active stop by clicking the Delete
button to the right of the stop's dialog boxes. (These
buttons will be grayed out if you have only two of that type
of stop.)
With a basic understanding of the Gradient
Editor dialog box, you can now modify existing gradients to
create custom gradients.
|