Class Styles
Welcome to my new *Series "Class Styles 101".
The format of learning will be strictly visual
whenever possible. Over the next few months I will
be adding additional Styles you can create
from my personal collection. To keep things simple,
we will be throwing out all selections, clipping
paths,filters, layer masks,additional layers, and
all tools...well almost all.
This class is intended for beginners new to
Photoshop. It will familiarize the user with working
knowledge of the Layer Style palette and will
allow you to add a New Style saved to your
private library at the end of each session.
The only tools you will need are the Text
tool and the Layer Style and Layers
palette.
All that will be necessary is the switching of
palette views and input of data. When working
Tutorials, simply compare image views and input data
into fields directly below.
Important note... All created files will be at 225
dpi. Styles created will produce high quality
printing, and can be converted to web use easily.
Let's get started...but first some basic's of using
the Layer Style palette. Don't be concerned
with recalling all information below at first
glance, this page is intended as a reference source
for all class sessions. It will be updated when
needed.
Launching the Layer Style palette
In the Layers palette, (after text is
created) click on the bottom left button with the "F"
to bring up the pop-up menu and choose selection.
An alternate method using the Menu would be: Go to
Layer > Layer Style > (then choose
category from above).
Anatomy of the Layer Style palette.
The palette is disected into 3 working area's. Left
you will find the Category Styles panel. This
is where you will switch to different palette
controls. To do so, simply click on the category
name to change controls in center area of palette.
Center panel
displays each category's controls. Below is a sample
of the Pattern Overlay controls.
Right panel displays 3 buttons and a
preview of your "New Style" as it is being created
for your library.
OK...Apply's effects and closes Layer
Style palette. (only use when all work is
completed and the "New Style" has been saved.)
Cancel... Self explanatary.
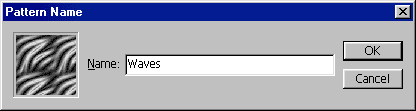
New Style... Clicking this button brings up a
dialog box that allows you to name your "New Style"
prior to saving and adding to the Styles
library. Use this button to save Style at the
end of each session!
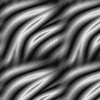
Adding a Pattern to the Pattern Overlay library
Open image in Photoshop.
Using the Menu... Go to Edit > Define
Pattern and a dialog box will appear that allows
you to name the pattern. Name it if you like, then
hit OK to load it to the Pattern Overlay
library.
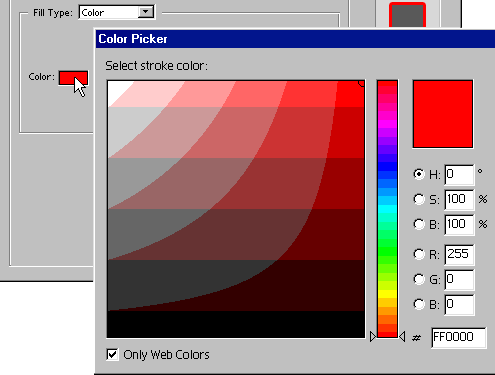
Using the Color wells.
Clicking a Color well activates the Color Picker.
Here you can simply click a desired color or enter
data at bottom of palette. Click OK when
finished to close.
Converting 225 dpi graphics to 72 dpi Web use.
Go to Image > Image Size. When the
dialog panel appears, Enter 72 dpi and reset
Width and Height sizes to original
dimensions.
Accessing the various libraries.
Clicking the drop-down arrow displays the current
library. Clicking the right arrow button launches
the library pop-up menu.
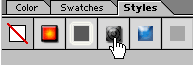
Applying your Styles.
In the Styles palette, simply click a button to
apply the effects. If the Styles palette is not
visible, go to Window > Styles.
Now, that we are all pro's on these basic
techniques...