Graphics Introduction (Part 2)
Image Size
Image size refers both to the height and width of the image in pixels and the
file size. Large graphics take a long time to download over the Web and many
people will become impatient. Try to keep your graphic files less than 35K in
size.
Image resolution also affects the size of an image. The standard resolution
for Web graphics is 72 dpi (dots per inch). Most image editing programs have
commands to change the resolution. For example, in Adobe Photoshop choose Image
Size from the Image menu to set the resolution.
Also make sure your graphic is not larger than 600 pixels wide. Images wider
than that require scrolling on smaller monitors. Most graphics applications
have commands that display the size of the image in pixels. For example, in
Adobe PhotoShop choose Image Size from the Image menu to see the
dimensions of an image.
For example an image that is 720 pixels wide is too large to fit within a standard
browser window. You would have to scroll horizontally to see the entire image (unless your
video resolution is set very high) and horizontal scrolling is big taboo on the Web.
Transparency
The GIF 89A file format enables designers to designate one color of a
graphic to be transparent. If a transparent graphic appears on a colored
or textured background you will be able to see the background through
the transparent parts of the graphic.
The figure below illustrates the problem with non-transparent graphics.
Notice that Figure 1 has the white background of the GIF appearing against
the grey background of the table. Figure 2 is the same graphic except
saved in GIF 89A format with grey as the transparent color. Notice that
the background color of the table cells appears.
Figure 1

This is an image with a white background saved in GIF format. |
Figure 2

This is the same graphic in GIF 89A format with grey selected designated as the transparent color. |
There are many tools to specify a transparent color in a GIF file. It is
probably best to perform this task when you are originally saving the graphic.
For example, to specify a transparent color in Adobe PhotoShop, choose File,
Export and then choose GIF89A. Use the eyedropper to select
the desired transparent color.
Image Maps
Image maps let you specify different hot spots on a single image. For example,
the image below has five hot spots linking to five different URLs.

Many Web publishing programs like Microsoft FrontPage and Macromedia DreamWeaver
support image map creation. Adobe Photoshop can also be used to create image
maps. In addition, there are numerous shareware programs available. This tutorial
outlines the process for creating image maps with the shareware program called
MapEdit and with Microsoft FrontPage.
The instructions below describe client-side image maps. Client-side image maps
store link and coordinate information in the HTML page itself rather than in
a separate file on the server. Client-side image maps are supported by Netscape
Navigator 2.0 and later, NCSA Mosaic 2.1 and 3.0, and all versions of Microsoft
Internet Explorer.
Creating Client-side Image Maps with MapEdit
- Download MapEdit from http://www.boutell.com/mapedit/
- Install the software on your computer. The Macintosh version of MapEdit requires Macintosh Runtime Java.
- Create an HTML page with one or more inline images specified with the <IMG> tag.
- Open the HTML document in MapEdit.
- MapEdit displays a list of the images in the HTML document. Select the one for which you want to create
an image map.
- Choose the Rectangle, Oval, or Polygon tool and draw a hotspot on the image.
- To create a rectangle, select the Rectangle tool, click the mouse where you want the upper left
corner of the rectangle to be, then click the mouse where you want the lower right corner to be.
- To create circles, select the Circle tool, click where you want the
center of the circle, and then click the outside edge of the circle.
- To create a polygon, select the Polygon tool and click the mouse where
you want each point of the polygon. (If you're using a Macintosh computer,
close the polygon by double-clicking on the last point. PC users, right-mouse-click
on the last point to close the polygon.)
- If you make a mistake using the tools, it's easy to delete a hotspot and try again.

- When you have completed drawing the hotspots, MapEdit displays a dialog
box where you can enter a URL for the hotspot.
- When you have created all desired hotspots, choose File, Save HTML Document and
Mapedit saves the HTML file. Note, Mapedit has not changed the graphic file.
- Test the image map in a Web browser.
MapEdit inserts client-side image map code into the HTML document.
<img src="studying.gif" usemap="#studying" border="0">
<map name="studying">
<area shape="circle" alt="Apple Computer"
coords="65,154,25"
href="http://www.apple.com">
<area shape="rect" alt="The University of Texas"
coords="110,29,229,102"
href="http://www.utexas.edu">
<area shape="circle" alt="Yahoo"
coords="38,100,28"
href="http://www.yahoo.com">
<area shape="default" nohref>
</map>
The <AREA> tag indicates the shape of the hotspot, the coordinates, and
the URL. For example, the first <AREA> tag within the map is a circle
with center at 65,154 and a radius of 25. This hot spot points to www.apple.com.
The next <AREA> is a rectangle whose upper left corner is 110,29 and whose
lower right corner is 229,102. This hot spot links to www.utexas.edu. The USEMAP
attribute of the <IMG> tag tells the browser which map to use.
Creating Image Maps with Microsoft FrontPage
- In the FrontPage Editor, choose Insert, Image to place an image in a Web page.
- Click once on the image to select it.
- When the image is selected, FrontPage’s Image toolbar appears at the
bottom of the screen. The Image toolbar has tools for creating hotspots and
selecting a transparent color (see below).
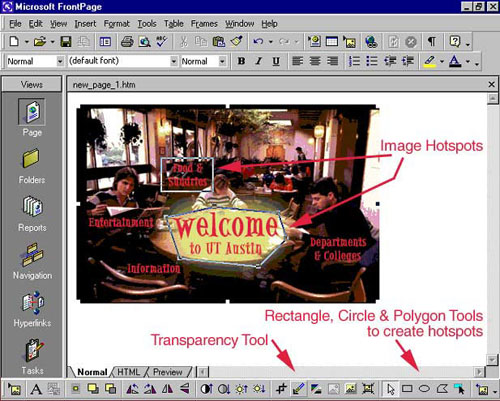
- Select the appropriate tool and draw a hotspot. When you release the mouse,
FrontPage displays the Create Hyperlink dialog box where you can type the URL for the hotspot.
- When all hotspot have been created, choose File Save to save
the document. If you made changes to the transparency of the image, FrontPage
will also ask if you want to save changes to the image.
Animated GIFS
An animated GIF consists of several frames, each of which is an individual
GIF file. The individual frames can be created in any graphic application that
supports the GIF format. A special animation utility can then take the individual
frames and save them as an animated GIF.
To create an animated GIF begin by constructing individual frames using your
favorite graphics program. Each frame should be the same size. The table below
shows five individual GIF files and an animated GIF using those frames.
| Individual Frames |
Final Animated GIF |
Frame 1

Frame 2

Frame 3

Frame 4

Frame 5
 |
 |
Like image maps, there are shareware tools and professional Web graphics programs
that can create animated GIFs. On the Macintosh, GIFBuilder is a freeware tool.
GIFBuilder is not being maintained but is presently available at
http://www.shar.dk/sally/index2.html
under "Mac Stuff". GIF Construction Set is a popular PC utility used
to create animated GIFs. Steps for using both of these utilities appear below.
A very popular professional Web graphics application used to create animations
is ImageReady. ImageReady is included with Photoshop 5.5.
Creating Animated GIFs with ImageReady 2.0
- ImageReady is available with Photoshop version 5.5. It allows you to create
animations by using the Animation palette and the Layers palette. The Animation
palette is used to define each frame and the Layers palette defines the image
state associated with each frame.
- Choose File/Open and locate the multi-layered image you want to animate.
In a multi-layered image, each layer will become an individual frame.
- In the Animation palette, choose Make Frames From Layers from the animation
palette. Each layer will appear as a frame in the Animation palette.
- To set the time delay between each frame, position the pointer on the time
beneath each frame in the Animation palette. Click to display the Frame Delay
pop-up menu. Select one of the preset times, or choose Other and set the time
desired. To set the time for all the frames at one time, choose Select All
Frames from the Animation palette menu. Shift+click will select individual
frames and Control+click (Windows) or Command+click (Macintosh) will select
discontiguous multiple frames.
- At the bottom of the Animation palette, choose Once from the Looping pop-up
menu and then click the Play button to view the animation.
- Frames can be reordered in the Animation palette by clicking on the frame
you want to move and dragging it to the desired location.
- To save the animation, choose File/Save Optimized As. Give the animation
a new filename with an extension of .gif and click Save.
- The animated image is now ready to be included in the HTML document using
the <IMG> tag.
Creating Animated GIFs with GIF Construction Set (Windows)
- GIF Construction Set is a shareware utility that you can download from
http://www.mindworkshop.com/alchemy/gifcon.html.
After you download the software,double-click the gifcon32 icon to install the software.
- Select Animation Wizard from the File menu of GIF Construction Set.
- Click Next to accept each of the defaults until you reach the file selection screen.
- Select the individual source GIF files that will comprise your animation.
You can do this one at a time, or all at once by holding down the Control
key and clicking on each file name in sequence. Click on Open when you’re done.
- When you have finished selecting file, click on the Cancel button in the Open dialog box. This
will return you to Animation Wizard window. Click on Next.
- Click on Done. Animation Wizard will build your animation and open it in
the main GIF Construction Set window.
- You can preview your animation by clicking on View. Press the ESC key to stop the animation.
- Save your animation to a new GIF file name by selecting Save As from the File menu.
- The animated image is now ready to be included in the HTML document using the <IMG> tag.
Creating Animated GIFs with GIFBuilder (Macintosh)
- Download GIFBuilder from
http://www.shar.dk/sally/index2.html, and install it on your Macintosh.
- Select File and New.
- Open the Frames and Preview windows.
- Drag the first image file to the Frames window.
- Drag the second image file to the Frames window.
- Continue until all the files needed for the animation are in the Frames window.
- Select Options Loop and indicate the number of times you want
the animation to be performed or click Forever.
- Select Options Interframe Delay and choose how fast you want the images to change.
- From the Animation menu, select Animation, Start.
- To stop the animation, go back to the Command menu and choose Animation, Stop.
- Save the animated file with a new name and an extension of .gif.
- The animated image is now ready to be included in the HTML document using the <IMG> tag
<< Previous Beginners Article |
Next Beginners Article >>
Beginners Main Menu 1 to 7 |
Beginners Main Menu 8 to 14 |
Beginners Main Menu 15 to 21
|