The Power of Hue and Saturation Adjustment
I have been using the Hue and
Saturation Adjustment tools that Photoshop provides for a
long time. Usually I am just making overall image
adjustments, but from time-to-time there is a specific area
of an image that needs adjustment when the rest of the image
should stay the same. Here's how to do that.
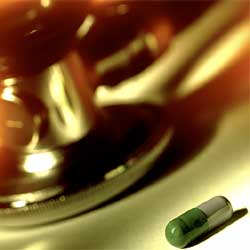
Above I have a photo. I would like to change
the hue of the pill in the foreground from green to blue.
But I don't want to mess with the rest of the image too
much. So how do I do that? We first thing to do is to open
the Hue and Saturation adjustment box. Go Image->Adjust->Hue
and Saturation.
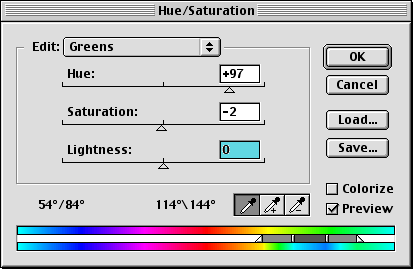
Above is the dialog box that appears when
you have done the previous steps. I have already made some
adjustments but let me explain what I did.
1) The first thing I did was to change the
color edit drop down menu to Greens. This will allow me to
make adjustments to the green pixels in the image.
2) Once I have selected green as my editing choice, I can
use the ink dropper tool that Photoshop automatically
provides me to select the green in the pill. I had to try a
few times to get it in the right place.
3) Once I had selected the correct green hue, I just made
some Hue adjustments by sliding the Hue slider to the right.
I also made some slight adjustments with the other sliders.
The actual adjustments are up to you, of course.
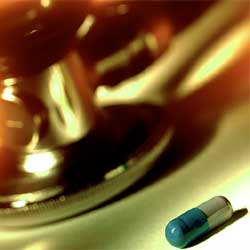
Above you can see my results. Using the Hue
and Saturation tools to adjust images is a very powerful way
of making subtle changes to an overall image. It can also
save you a lot of time if you have a single entity like this
one that needs changing. Play around with this idea and see
what you can do with it. It's a lot of fun.
|